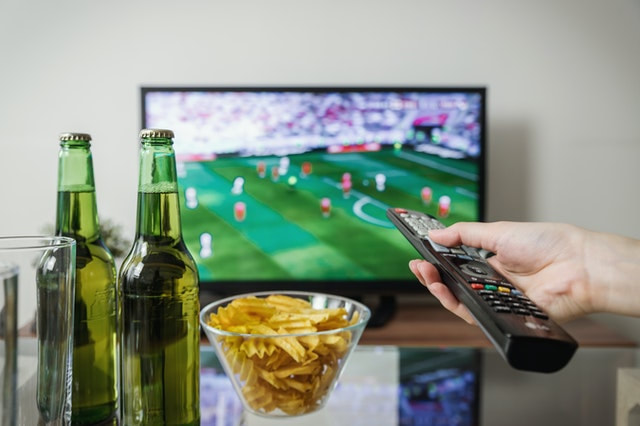
What is DStv dual view?DStv has managed to create a presence in many countries due to its great programming. More people are adding DStv decoders to their homes, and with all the great channels it has, you can understand why. However, if you have a DStv decoder at home, a major challenge you will experience is a lack of order in watching. With DStv dual viewhowever, you are sorted. In any household, everyone has a unique taste, and they might be different from those of everyone else in the house. This can cause some drifts, especially if everyone’s favorite program is running at the same time. DStv has created a solution for this through the DStv dual view option.
It is a convenient way to connect multiple decoders to one and enjoying the flexibility it has to offer. You can now connect different TVs in the house to different decoders, and everyone can watch or record their favorite shows. It is convenient because you won’t need to pay for an additional subscription to enjoy DStv dual view. All you need to do is purchase additional decoders and connect them to your primary decoder. The package you have subscribed to will appear on all the additional decoders, and you can now enjoy your favorite shows uninterrupted. How do you connect DStv dual view cables?Although it is a convenient way to enjoy watching DStv at home, making a DStv dual view connection is challenging for many people. Linking up to three decoders will need some knowledge in DStv connections, and if you don’t have it, you can learn. It is simple and will give you a new and entertaining perspective.
Before connecting your cables, you should ensure your decoders are DStv dual view capable. You can check for this from Multichoice. In the connection, one decoder must be a DStv Explora to obtain the best experience. Once you have all the required items, you can begin linking your decoders using an LNB cable. You should ensure your cables are connected to the right ports, and you can check from the user manual to ensure you do it right. Once you have connected your DStv dual view, everyone can begin watching uninterrupted, and recording shows when you want to. https://en.wikipedia.org/wiki/DStv https://www.dstv.co.za/mydstv/help/faq/what-is-xtraview/ The post DStv Dual View appeared first on Dstv Installer Johannesburg - 063 872 7325. Via https://imveloawards.co.za/dstv-dual-view/
0 Comments
DStv decoder connection to your TVWhen making the DStv decoder, Multichoice has made it as connective as possible. They have ensured you can make a DStv decoder connection to your tv, the internet, and other decoders easily and conveniently. This article will help you understand various connections and how to make them. This is the primary connection that many DStv owners want to know since it plays a huge role in your watching experience. It is also the main connection many DStv owners make. For this, the most convenient way to make this connection through an HDMI cable. There is a port on the back of your DStv decoder and the back of your tv, and it will give you great picture quality.
DStv decoder connection with the dishTo get the signal into your DStv decoder, it must be connected to the satellite dish. It is a technical connection, and you might need the help of a technician. You will need an RG6 cable that will run from the back of your decoder to the satellite dish. This DStv decoder connection ensures you receive the proper signal from the decoder, and you can connect easily. You can check whether the DStv decoder connection to the dish is done properly by checking the signal strength. It is available on your user menu and is easy to do. If the signal strength is too low, you can check on this connection and ensure it is done correctly.
How to connect your decoder to the internetConnecting your decoder to the internet allows you to enjoy more channels and make more changes to your decoder. You can make regular updates to the system, and you will have access to shows from Netflix and Show Max. There are also several ways to connect our decoder to the internet, as you can use an ethernet cable or connect directly to your Wi-Fi network. There is a port for the ethernet connection at the back of your decoder, and all you need to do is plug the cable in from your decoder. It is convenient if your decoder and router are close. To connect to a Wi-Fi network, you will find the option on the DStv menu, and you can connect it easily. Making a DStv decoder connection is easy and very convenient. https://dstvguide.com/how-to-setup-connect-install-dstv-decoder/ https://en.wikipedia.org/wiki/DStv The post DStv Decoder Connection appeared first on Dstv Installer Johannesburg - 063 872 7325. Via https://imveloawards.co.za/dstv-decoder-connection/ Which are the most popular DStv decoders options?Over the years, the popularity of DStv has been increasing steadily. More homes worldwide are adding it into their entertainment, and it has been serving many very well. All the different channels it has to offer will give you and your family an impressive entertainment experience. With more people getting DStv, Multichoice has made better DStv decoders and improved signal reception and picture quality. The availability of different DStv decoders also allows you to select one that will work best for you. You now have options depending on the type of experience you want to have and the number of extra view connections you want to make. The DStvExplora and the 4U HD decoder are among the most popular DStv decoders available on the market. Many customers prefer these decoders owing to their simplicity of setup and strong signal connection. These decoders also have very good package options that will boost your entertainment experience. However, these two decoders have several differences, and you should look into them before you decide which is best for you.
Their pricing differencesThe main difference between these DStv decoders is their prices. Many customers are concerned about installing their DStv and how much they will pay for the packages. If you are concerned about this, you should focus on the price difference between these two decoders. Their price difference arises from their PVR function difference. PVR (personal viewer recorder) is a feature that allows you to record and save all your favorite shows for viewing later. It ensures you never miss a moment of your favorite show, making it very convenient to have. This function is available for the DStvExplora, and plays a role in its pricing. What are the features of these DStv decoders?The features of these decoders are different since Multichoice released them at different times. The Explora and the HD decoder differences will affect the decision you make when purchasing one. DStvExplora featuresThe DStvExplora is regarded as one of the best decoder options from Multichoice. It has great features that make it reliable, especially when making an extra view connection. It acts as a good primary decoder. Its main feature is the recording option. If you are watching live tv, this option allows you to pause, complete anything you were doing and continue viewing. You can also rewind in case you missed anything, making it very convenient. This option on the Explora also allows you to save recordings and watch them at a later date. It allows you over 100 hours of watching time, and this feature is unique to the Explora. It also has an option to connect your decoder to the internet. When connected, you can enjoy additional programming such as Netflix and Show Max. this feature also allows you to download any available update for DStv decoders from Multichoice, and you will always have a well-performing decoder. All these mean that your Explora must be connected well to enjoy all it has to offer.
DStv HD 4U decoder featuresMany have preferred this decoder since it has a good picture quality and is relatively cheaper than the Explora. It is among the most popular DStv decoders, especially for homes and small-scale viewing and has a compact design that makes it very durable. It can withstand small falls owing to its shape as it protects the vital parts from damage. This decoder is also great for extra view connections. It can serve as a secondary decoder very well and will receive signals easily. If you are using two connections, you can even add it as your primary decoder. The decoder has fewer cable connections, giving it a cleaner look and making its installation simpler. Which DStv decoder should you pick?These two DStv decoders offer good performance and are very reliable. Your pick should depend on what entertainment experience you want since they offer a different one. The Explora will work well for some, while the HD 4U will work well for others. You can also consider more DStv decoders, and your accredited installer will guide you on this delicate process. Ensure you know what they all have to offer before settling on any. https://www.dstvafrica.com/en-ke/decoders-list https://en.wikipedia.org/wiki/DStv The post DStv decoders appeared first on Dstv Installer Johannesburg - 063 872 7325. Via https://imveloawards.co.za/dstv-decoders/ Connecting your decoder to the internetMultichoice is always working on new ways to make your watching experience better. Although DStv is among the biggest entertainment option in many countries, many other companies are stepping up and giving Multichoice a run for their money. Multichoice has managed to stay ahead and counter their competition through innovative ideas such as the Wi-Fi DStv connection. This feature allows your decoder to connect to your home Wi-Fi and lets you enjoy online content and other streaming services. If you enjoy watching ShowMax, the decoder lets you watch all your favorite shows on this streaming platform once you have made the DStv connection. You can also save all your favorite shows without running out of space. What is needed to make the Wi-Fi DStv connection?This feature is currently only available on the DStv Explora decoder. If you are using older model decoders, you will need to upgrade and enjoy all the great and convenient features it has to offer. You must also have an internet connection in your home. It is on this network that you will establish your DStv connection. The internet speed should also be reasonably high to ensure a smooth watching experience. It will ensure all your shows continue uninterrupted and that you have more fun watching your DStv. There are two connection options you can use, a wireless connection or a wired connection. You can use your most preferred method, and it will work well.
Making a wired connection with an ethernet cableThis is a great option if your DStv Explora and router are in the same room. When using an ethernet connection, you can get a steady connection, and your steaming will be more convenient. You will achieve high picture quality, and the DStv connection will be more reliable. The process is simple, and you won’t need any tools or technical knowledge. By following this simple guide, you can connect on your own without needing a technician to assist. Behind your DStv decoder, there is a green ethernet port for this purpose. Insert one end of your ethernet cable into it and the other end into your router. You can now grab your remote and ensure the connection is established from the user menu. Press the “help” option on your remote and select “tools.” Among its options is the connectivity checker. Click on it. You can now switch on all your connected services, and all features that need an internet connection to work will get activated. Once this is complete, you will have successfully made an ethernet and DStv connection, and you can begin enjoying it. Connecting your DStv Explora decoder through Wi-FiThis is a very convenient option if your router and decoder are far apart. It will also maintain a clean setup look since there won’t be any cables running across your sitting room. It is very convenient, but you can only use this option if your Wi-Fi connection is strong and has relatively high speeds. This DStv connection is also data-intensive, and you should ensure you have an unlimited amount of data. If you cannot connect your router and decoder, you can use a DStvWi-Fi connector that will automatically complete the process for you. This option also needs your router to have a WPS button that helps establish a secured connection easily and automatically. What to do if your router doesn’t have a WPS buttonIn some instances, some routers don’t have a WPS button. Since it is essential when establishing a connection, you will have to improvise. There is a simple way to get around this challenge, and you can go back to connect your DStv Explora to your home Wi-Fi.
Insert a Wi-Fi connector into your laptop and make some easy configurations. Enter your Wi-Fi password into it, and you are all set to carry on with the connection. Insert this connector into your DStv Explora, and it will begin receiving Wi-Fi signals from your decoder, and you can complete your setup process. Using the connectivity checker, search for the Wi-Fi network you want to connect to, and your decoder will be connected automatically. You can now use your decoder on the internet. What are the benefits of setting a DStv connection with your Wi-Fi?Many benefits come with connecting your DStv Explora decoder to the internet. They range from technical advantages to entertainment reasons. One of the most notable advantages is that you get a wider entertainment library. Once your decoder is connected to your Wi-Fi, you can begin enjoying other streaming services such as ShowMax. These have more movies and tv shows, and you are likely to find all your favorite shows here. It is very convenient, and you can switch between these great entertainment options whenever you need to. Another benefit is that you can always get online help whenever you encounter any problem. When using your DStv Explora, you are bound to get errors or problems that you are unable to fix. If your decoder is connected to the internet, you can automatically get the help you need. It will scan for possible solutions, and you can follow them and correct these errors. Multichoice is constantly working on new ways to make your experience with their DStv Explora decoder better. They release regular system updates that ensure you are always getting the best performance. If your DStv connection is activated, you can automatically get these updates into your decoder. You will never experience any challenges, and your decoder will always work great. Improved performance will result in a better entertainment experience. If your decoder is connected to your home Wi-Fi, you can also record and save all your favorite shows without running out of space. You will never have to miss any of your favorite episodes and are assured of the best watching experience. Making a DStv connection to your home Wi-Fi has many benefits to offer, and once you do this, you are all set. https://www.dstv.co.za/mydstv/help/dstv-hardware/dstv-wifi-connector-usb3000/ https://en.wikipedia.org/wiki/DStv The post DStv connection appeared first on Dstv Installer Johannesburg - 063 872 7325. Via https://imveloawards.co.za/dstv-connection/ What is DStv connect?Many people always have their smart devices near them most of the time. Multichoice is aware of this, and they have tried to make it as simple as possible for you to access your DStv information and make any change you want. You can do all these using the DStv connect platform. It will give you more control over your viewing experience, and you can enjoy all it has to offer.
DStv connect is an online platform that allows you to monitor your DStv decoder from wherever you are. All you have to do is create a profile and enter details about your decoder. You can log into the platform and make changes to your DStv, such as saving your favorite shows. It also allows you to upgrade or downgrade your DStv subscription whenever you want to. Is the DStv connect platform linked to my decoder?Yes, all the changes you make through your DStv connect site will be saved to your decoder, giving you more control over it. If you add a channel to your favorites, you will also find it saved to your decoder. It also allows you to record your favorite shows remotely, and all you need to have is your unique smart card number. How do you use your DStv connect?You first have to log into the online platform, and if you aren’t registered yet, you can begin the brief registration process. You will need your unique smart card number that will help to link your account to the DStv connect platform. To register, enter all the information required on the website, and an activation link will be sent to your email.
Once you activate it, your account goes online, and you can now begin using the platform. To log in, click on the sign-in option on the platform, and it will bring down a menu. You can now enter your details and proceed to log in. On this platform, you get more control, and you will never remain behind on any important information about your decoder. https://en.wikipedia.org/wiki/DStv https://www.dstv.co.za/mydstv/help/faqs/general/dstv-connect/ The post DStv connect appeared first on Dstv Installer Johannesburg - 063 872 7325. Via https://imveloawards.co.za/dstv-connect/ What types of cables are in a DStv cable connectionWhen you buy a DStv decoder, you will get several connecting cables that will help to transmit signals from one point to another. Some of these cables can come from the satellite dish to the decoder or from the decoder to the tv. It is vital to know your DStv cable connection to ensure you can handle any connection challenges you encounter while using your decoder. When you want to connect your decoder to your tv, there are various cable options. You can choose to use the cable from the manufacturer or an HDMI cable. The DStv decoder has been designed to offer many connecting options, and at the back of your decoder, you will see an HDMI port.
There is also an LNB cable that connects the Smart LNB to the satellite dish. It is a vital cable since it ensures the signal is transmitted to your decoder and that you can watch your shows. If you are using a DStv Explora decoder, there is also an RG6 cable that connects the smart LNB to your decoder. All these cables in your DStv cable connection play an important role in your viewing experience and making it better. How to make DStv cable connections to various pointsMultichoice has made it easier for you to connect all these cables to their rightful ports. The back of your decoder is marked to show all the different ports and what they connect to. These cables are all unique, and even when you make the wrong connection, it will be easy to identify them. The HDMI cable will run from your decoder to the back of your TV, and it offers great picture quality and a good viewing experience.
The RG6 cable is connected to the unicable port on your Smart LNB. Since it is the only cable connected here, you don’t have to worry about the wrong connections. This cable helps to transmit signals and ensure you can watch all your favorite shows conveniently. When you make any DStv cable connection, it is important to ensure they are done correctly. Whenever you encounter any challenges, you can consult your accredited DStv installer. https://en.wikipedia.org/wiki/DStv The post DStv cable connection appeared first on Dstv Installer Johannesburg - 063 872 7325. Via https://imveloawards.co.za/dstv-cable-connection/ Getting DStv accredited installers for your set upIf you want to join the majority of families in the world getting the best programming, you are thinking of getting a DStv connection. Multichoice has managed to create a good name as a company with the most enjoyable watching experience and a great selection of programs. To view all your favorite shows, you first need to install the system, and here you will need DStv accredited installers to assist. The installation process is very delicate, and some of the parts are very delicate such as the smart LNB, and if you handle them badly, they could break. Thus, it is a risky venture to take DStv installation as a DIY project if you don’t have prior experience. With the help of DStv accredited installers, you won’t have to worry about this. How do you become DStv accredited installers?DStv accredited installers are people who Multichoice has recognized as having fulfilled all the requirements of becoming installers. These are individuals who have emerged successful from the thorough testing practices of Multichoice and are well equipped to make installations. If you want to join these DStv accredited installers, you first have to register for a course at Multichoice.
The course will test your learning and technical skills and ensure you know all the aspects of a DStv installation. You will learn about the different parts of the connection, make them, and many more. Once you pass their assessment, you are registered among the DStv accredited installers. You will get an identification that will come in handy a lot in the course of your operations. DStv accredited installers are ranked in grades depending on the services they offer. Before you hire an installer, you should first confirm the level of service they can offer you and what they are legally allowed to do. However, some installers have grown themselves by mastering all the aspects of the DStv installation process and will give you any service you need. Multichoice also recognizes them. What are the requirements to become a DStv accredited installer?Many of these requirements are the basic requirements from the government that go with any employment opportunity. First, you have to be 18 years and above before learning about installation or getting work as an installer. Second, you must also have a good criminal record. If you have been convicted of serious offenses, it can be challenging to become an installer. You also need to be fluent in specific languages depending on where you will be operating from. Finally, you have to be comfortable at high heights. Since all DStv installations will include setting up a satellite dish that has to be high, you must not be afraid of heights. Once you complete all these requirements, you can proceed to the learning aspect of joining DStv accredited installers. What services do DStv accredited installers offer?The work of a DStv accredited installer will pan across all aspects of a DStv connection. If you need to install a DStv system into your home or business, these installers help you with it. You will also need their services when you experience different challenges with your decoder or signal reception. If your satellite dish isn’t aligned properly, you will need DStv accredited installers. They have the right tools to make all these connections, and you won’t have to worry about getting errors. If you do get any decoder error, the installer will come back and make the corrections for you at no extra charge. If you want to reset your DStv decoder, you can also hire DStv accredited installers. They will do it correctly, and you will get all the benefits the process has to offer. Another common problem DStv installers will help you with is connecting the various DStv cables. There is the RG6 cable from your dish to the decoder and others, especially for an extra view connection. Getting DStv accredited installers to help you make this connection will save you a lot of time. DStv accredited installers will also help you when your decoder loses channels or when you encounter a hard drive problem. They have the best and simplest solutions to these challenges, making them very reliable for all your DStv connection needs. How do you check whether an installer is accredited?Once one completes the tests from Multichoice, they get an accreditation certificate and a license. The license is meant for daily operations, and you can wear it while going to work or looking for a client. If an installer has the correct license, then they are accredited to offer the service. You should always be cautious about this to ensure you get the most value for your money when you hire the services of a DStv installer. You can also check on the Multichoice platform for recommendations from them, and these are usually accurate.
Why do you need to hire DStv accredited installers?Although most accredited installers will charge you slightly hirer than other installers, the services they offer are very valuable. Unlike hiring the services of just any installer, with an accredited one, you are assured of the correct connections. Since they are experienced and have vast knowledge in making these connections, they will do it right. DStv accredited installers will also save you money. They might be slightly costly initially, but thanks to their good connections, you won’t need repairs or replacements. They know how to set up the cable and prevent wearing out, and your signal will also remain strong throughout. The installer will also give you a great deal when you purchase your decoder and other DStv systems. How do you find DStv accredited installers?Most of these installers have companies, and tracking them down is simple. You can also get a recommendation from friends and family who have gotten great service from DStv accredited installers. Multichoice can also recommend some for you, or you could get an installer directly from them. When you get the proper DStv installer, you can sit back and enjoy all your favorite channels without the worry of losing signal or any other interruptions. https://www.dstvafrica.com/en-zm/find-installer-or-dealer https://en.wikipedia.org/wiki/DStv The post DStv accredited installers appeared first on Dstv Installer Johannesburg - 063 872 7325. Via https://imveloawards.co.za/dstv-accredited-installers/ Dish Installations process and cable connectionBefore you can begin enjoying DStv programs, dish installations are the first and most important thing to do. This is where you mount the satellite dish in an appropriate position to receive signals better. You must do it correctly since it can affect your viewing experience. Your dish plays a huge role in the picture quality you get, and so it has to be great to work well. An accredited DStv installer can do the dish installations, who is more experienced in making these connections. If you are an enthusiast, however, and like to engage in DIY projects, you can set up the satellite dish on your own. It will give you a great learning experience, and you will also save some money. However, the process is very technical, and if you are not keen enough, you can easily do it incorrectly. What do you need for dish installations?When making dish installations, you will need several specialized tools. These will help you in the connection’s different areas and ensure the process is as simple as possible. Some of these items will also come with your dish installations package, and you won’t need to buy them. Most of the tools you will need are your ordinary DIY and minor home repair tools.
First, you will need a cement drill to help you drill into the walls where you intend to mount your satellite dish. You will also need a screwdriver for fitting in several screws for the dish, an electrician’s tape. Once you have these, you can proceed with the dish installations, and in no time, you will be enjoying all your favorite shows. How to install a DStv dishWhen you purchase your dish, it will come with all the vital parts of the connection. These include four steel screws, a long RG6 cable, a smart LNB, and a mount for the satellite. First, you will have to set up the mount before you can connect the dish to it. Since the dish is quite fragile and any interference could damage it, follow this process closely. Identify the perfect location for your satellite mount and ensure any buildings or trees do not block it. It should also be facing eastwards for maximum signal reception. Using your cement drill, make four holes on the wall where the mount is to be attached. These should be deep enough to ensure the screw goes fully in for stability purposes. Once you have dug these holes, you can now set up the satellite mount onto it. Ensure it is firmly in place to prevent it from getting disconnected by strong winds or tough weather. Once the mount is connected, you can now set up the satellite dish. In dish installations, you will also need to connect the smart LNB device to the satellite. It is a small white device that comes with your dish, and it is the visible arm-like part of the satellite dish. The smart LNB helps to transform radio signals into ones your decoder can understand easily. It thus plays a huge role in your viewing experience and the picture quality you get. Setting it up only needs a few screws and a screwdriver, and the former is available on your DStv package. Setting up cables for dish installations.Once you are done setting up the satellite dish, you can connect all the needed cables. It is a simple process since the ports are well marked, and the cables are unique. This part of the dish installation process will take you a short time but should be done very carefully. Connect one end of the RG6 cable to the smart LNB and connect the other end into the necessary port on your decoder. The end of the RG6 cable is quite fragile, and you should make these connections carefully. The cable should also run closer to or pinned to the wall to prevent it from wearing out faster.When you do this during dish installations, the connection will last longer and will work better.
Aligning your satellite dish correctly.This process in dish installations happens after you have made all the connections and tested your signal strength. It helps you make any necessary corrections and realignments that will ensure your decoder is working properly. If the signal is good, you can skip this process, but you will have to realign the dish if it is bad. Using your sat meter, measure the signal strength in all directions. Point your dish in the direction with the highest signal so that it gets proper reception. You can also use the tool to check for the elevation of your satellite dish. A DStv technician will advise you to place it between 36- and 39-degrees during dish installations for the best signal reception. You will also need to adjust the smart LNB once you are done aligning your decoder. Test it consistently to ensure you are getting the strongest signal. It will ensure your decoder is receiving quality converted signals and that you have the best picture quality. Checking for the stability of the satellite dishThe final process in dish installations is checking for the stability of your satellite dish. The satellite dish will be outside, and your installation should be strong enough to hold it in place. You can tag on it severally to check whether it will come off or reinforce it with more cement screws. The smart LNB should also be firmly attached to prevent it from falling off. Dish installations are a technical yet easy-to-learn process, and you can choose to either get the services of a technician or do it on your own. in a short time, you will understand how everything in the connection works. When you encounter any need for repairs, you won’t need to call a technician since you can make the repairs. https://www.wikihow.com/Install-a-Satellite-Dish https://en.wikipedia.org/wiki/DStv The post Dish Installations appeared first on Dstv Installer Johannesburg - 063 872 7325. Via https://imveloawards.co.za/dish-installations/ What you need for dish installationIf you enjoy taking part in DIY projects, DStv dish installation is the challenge you have been looking for. It offers you a great learning opportunity, and you can make use of all your tools in the process. Learning DStv dish installation saves you money from hiring technicians and allows you to easily make repairs whenever needed. Most essential items needed in this process are available in your package when you purchase a DStv decoder. You will find the satellite dish, its base mount, four steel screws, and a connection cable. All these items will be used in the setup, and you can use your basic tools for this process.
Setting up the dish mountFirst, you have to identify where you will set up your dish before you begin. It should be a high place without trees or buildings blocking it. When you do, use a cement drill to drill holes for your dish, and when you are done, you can begin setting up the base mount. Place the base on the wall where you intend to attach it and hold it in place using the steel screws. Ensure the mast is firmly in place and can withstand harsh weather and strong winds. When done, you can now set up the dish on the mount. The center of the mount should be attached to the appropriate areas of the dish. Checking for connections and realigning the dishYou can now proceed to set up the cable connections to determine whether you have done it correctly. Run the RG6 cable from the dish and into the decoder and connect it to the appropriate ports. It will help you determine whether you have made the connection correctly. Run the setup menu and confirm the signal strength on your decoder.
When the signal is poor on your decoder, you can begin realigning the dish. Ensure it is facing the east for the best signal reception. It should also fall within the appropriate degrees of elevation recommended by Multichoice. When you make these corrections, the signal strength of your decoder will improve. The dish installation process is simple and will give you a great learning experience on making DStv connections. https://en.wikipedia.org/wiki/DStv The post Dish Installation appeared first on Dstv Installer Johannesburg - 063 872 7325. Via https://imveloawards.co.za/dish-installation/ What is a 3 Explora extra view setup?One of the best aspects of having a DStv subscription is making the extra view connection. It is a new invention from Multichoice that allows you to connect three decoders while using the same subscription. The DStv Explora decoder is the best for this connection, and you can use it as a primary or secondary decoder. Here is how to make a 3 Explora extra view setup.
In a 3 Explora extra view setup, there is a primary decoder and another secondary decoder. It is always advised to have the primary decoder as an Explora, and in the connection where the rest too are Exploras, it gets better. The primary decoder is from which the rest get a signal, and it is the subscription on this decoder you pay for. The other decoders are called secondary decoders and can be connected to different TVs and act independently, only linked to one account. Since the DStvExplora is a newer decoder version, its connection is much simpler. Making a 3 Explora extra view setupSince these three decoders have similar ports, you can connect them using a smart LNB. It will link them together, and you can begin the setup process. If you want to connect them to different TVs, you can. Just connect the RG6 cables from your decoders to the LNB’s Unicable port. You can now connect all the decoders in the 3 Explora extra view setups to different TVs.
Running the quick setup process.Once you complete cable connections, you can now proceed to run the quick setup. This process lets other decoders detect and use the signal from the first decoder. The scan process will be run from the menu of the primary decoder. It will show the other Explora decoders and their signal strength. In a 3 Explora extra view setup, all decoders can be viewed differently, and everyone can watch their favorite shows. You can also save shows on your DStvExplora decoder and have a good experience. https://en.wikipedia.org/wiki/DStv The post 3 Explora extra view setup appeared first on Dstv Installer Johannesburg - 063 872 7325. Via https://imveloawards.co.za/3-explora-extra-view-setup/ |


 RSS Feed
